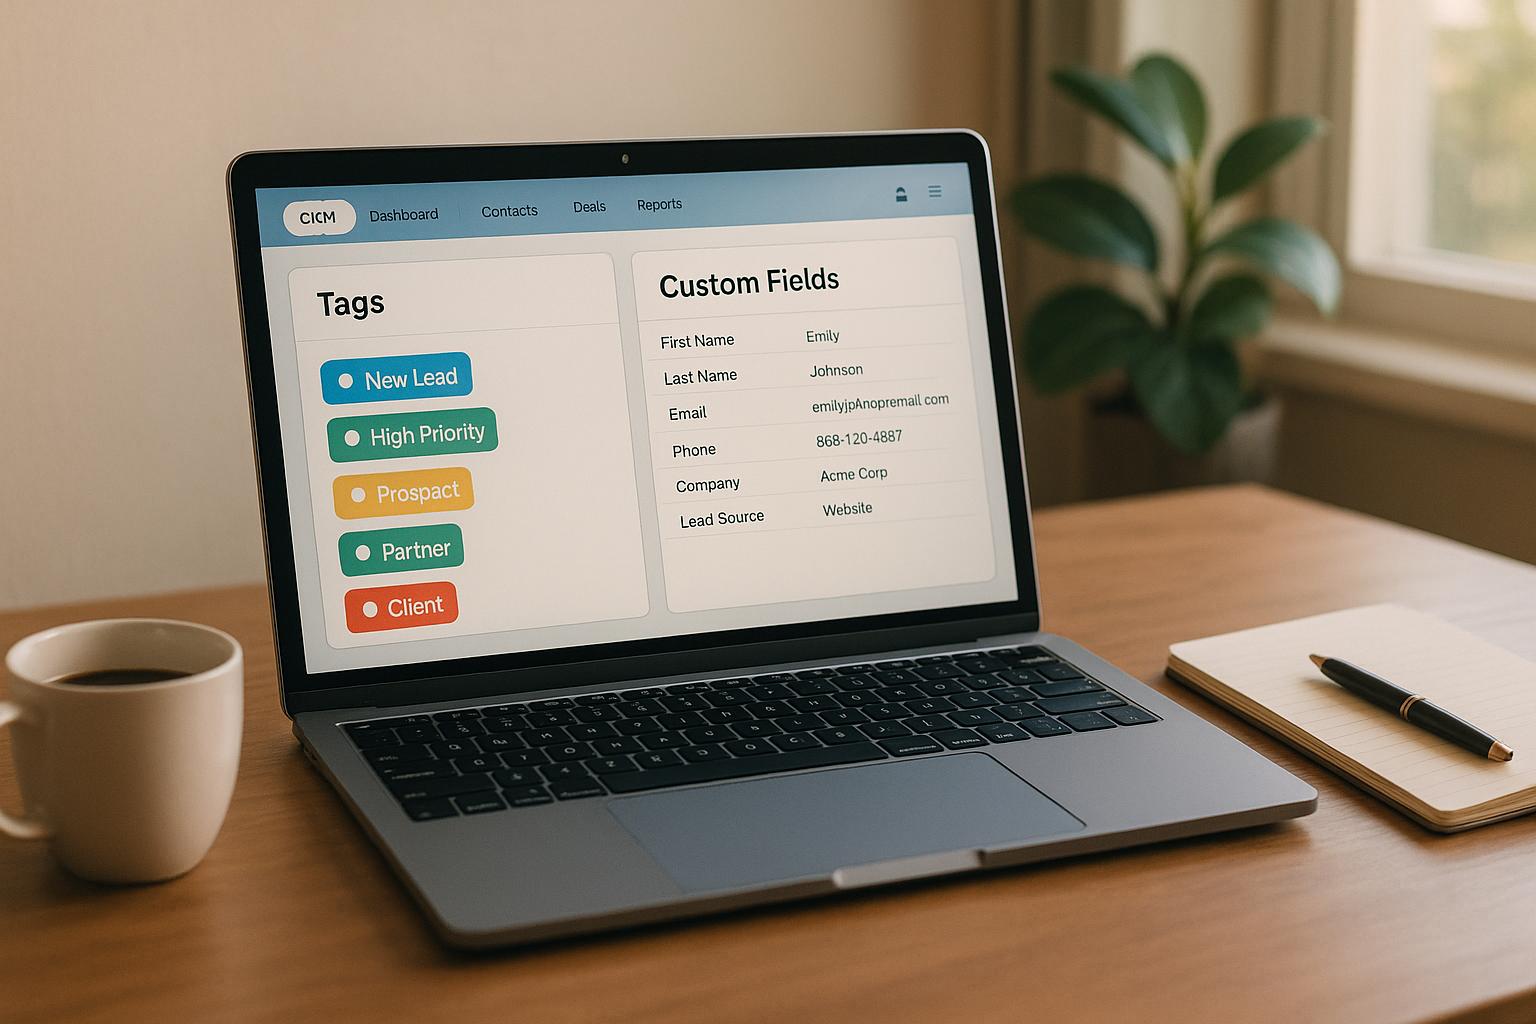
Custom fields in HighLevel allow you to collect, organize, and use additional data tailored to your specific business needs. These fields help you go beyond standard information like names and emails, enabling personalized client interactions and streamlined workflows. Here's a quick summary:
- What Are Custom Fields? User-defined fields for storing specific data like customer preferences, purchase history, or lead sources.
- Why Use Them? Improve segmentation, personalization, and automation, leading to better client interactions and higher efficiency.
- How to Set Up:
- Go to Settings > Custom Fields.
- Click Add Field and choose the input type (e.g., text, dropdown, date).
- Assign a name, group, and save.
- Field Types: Options include text, dropdowns, date pickers, monetary fields, file uploads, and more.
- Integration: Add custom fields to forms, workflows, and pipelines for automation and personalized communication.
- Best Practices: Regularly review fields, maintain data quality, and avoid clutter to keep your system efficient.
Custom fields are essential for businesses aiming to personalize their marketing and automate tasks. By using them effectively, you can enhance client relationships and optimize your processes.
Setting Up Custom Fields in HighLevel
Finding the Custom Fields Section
To access the Custom Fields area in HighLevel, start by navigating to Settings in your sub-account's left-hand menu. This will take you to the main settings page, where you can manage various configuration options for your account.
Scroll down until you find the Custom Fields option and click it. This will open the Custom Fields management page, where you can view any fields you've already created or set up new ones for Contacts or Opportunities.
Creating a New Custom Field
To create a new custom field, click the Add Field button located at the top-right corner of the Custom Fields page.
From here, you’ll need to choose an input type - this defines the kind of data the field will collect. Options include text fields, dropdown menus, radio buttons, and date pickers. You’ll also need to specify the object the field will apply to: either Contacts or Opportunities.
Next, give your field a clear and descriptive Field Name. If you’re organizing related fields, you can assign them to an existing Group or create a new one. For dropdown menus or radio buttons, take a moment to set up the Option Names and Values to ensure users can select only from the choices you’ve defined. Once everything is configured, click Save to finalize your new custom field.
After saving, it’s a good idea to double-check your work. Look at a contact record (for Contact Custom Fields) or an opportunity card (for Opportunity Custom Fields) to confirm that the new field appears as expected.
Once verified, you can integrate these fields into your forms or pipelines to streamline your workflows.
Adding Custom Fields to Forms or Pipelines
Setting up custom fields is just the beginning - the real power lies in integrating them into your forms and workflows. HighLevel makes this process simple with its form and survey builder tools.
In the form or survey builder, you’ll find your custom fields under the Add Form/Survey Element section. They’re grouped into Contact and Opportunity categories, making it easy to locate the specific field you want to use.
To add a field, simply drag and drop it into your form. For Opportunity custom fields, you might need to tweak your opportunity settings to ensure the data flows smoothly through your sales pipeline.
Once integrated, these fields enable better segmentation and personalization. The information collected flows directly into contact records, where it can be referenced in emails, text messages, and notes. This creates a seamless experience, from the first interaction with a client to ongoing relationship management.
Custom Field Types and When to Use Them
Available Field Types
Once you've added custom fields to your workflows, picking the right type of field is key to efficiently capturing and organizing data. HighLevel provides a variety of custom field types, each suited for specific purposes.
- Text fields: Ideal for short inputs such as names or job titles.
- Large Text fields: Perfect for longer entries like detailed comments or descriptions.
- Numerical fields: Great for capturing numbers like ages, quantities, or ratings.
- Monetary fields: Used for tracking currency values, ensuring consistency in budgets and financial records.
- Phone fields: Standardize contact number formats for easy communication.
- Date fields: Include a calendar picker to simplify scheduling and reduce formatting errors for dates like appointments, deadlines, or follow-ups.
- Single Option (Dropdown) fields: Provide a clean, predefined menu for users to choose from.
- Radio buttons: Display all options at once, ideal for limited choices like yes/no questions.
- Multiple Option (Dropdown) fields: Allow users to select several items from a predefined list.
- Checkbox fields: Useful for simple yes/no inputs or acknowledging terms and conditions.
- File Upload fields: Enable users to submit documents, images, or other files directly through forms.
- Signature fields: Capture digital signatures for agreements or contracts.
- Textbox List fields: Offer multiple input areas, helping to organize related data in a structured format.
By selecting the field type that aligns with your data needs, you can improve both personalization and automation within your workflows.
Examples for Each Field Type
To make the most of custom fields, it's important to match the right field type with your specific business needs. Here are some practical examples:
- Text fields: Use these to log client preferences, such as "Preferred Communication Style" to note whether they prefer formal or casual interactions.
- Date fields: Track deadlines or key dates. For example, an "Expected Close Date" field helps sales teams stay organized, while a "Next Follow-Up Date" ensures no lead is overlooked.
- Monetary fields: Perfect for budget management. Fields like "Customer Budget Range" or "Expected Deal Value" aid in tailoring proposals and forecasting revenue.
- Dropdown fields: Standardize data entry. For instance, a "Lead Source" dropdown with options like "Facebook Ads", "Google Ads", or "Referral" ensures consistent tracking, avoiding variations like "FB" or "facebook." Similarly, dropdowns can simplify sales stage tracking with options like "Initial Contact", "Proposal Sent", or "Closed Won."
- Radio buttons: Great for binary choices. For example, a "Monthly or Annual Plan?" field with two radio options makes the decision process straightforward.
- Numerical fields: Use fields like "Probability of Close (%)" to prioritize leads or "Company Size (Employees)" for market segmentation.
- Multiple Option (Dropdown) fields: Ideal when clients need multiple services. For example, a "Services Needed" field for a web design agency could include options like "Website Design", "SEO", or "Social Media Management", allowing clients to select all that apply.
- File Upload fields: Simplify document collection. A "Contract Upload" field can save time on back-and-forth emails, while a "Logo/Brand Assets" field helps creative teams gather essential materials upfront.
These custom field types transform simple records into detailed, actionable profiles, paving the way for more tailored interactions and improved results in your business processes.
How To Use Custom Fields
Using Custom Fields in HighLevel Workflows
Custom fields aren't just for storing data in HighLevel - they can become the backbone of your automation and CRM strategies. These fields can trigger actions, tailor communications, and ensure consistency across all client interactions.
Adding Custom Fields to Forms
Custom fields can be seamlessly added to forms, allowing you to collect specific data that instantly triggers workflows. For instance, text fields are great for capturing client preferences or unique needs, while dropdown menus help standardize responses, making automation smoother.
Take this example: A fitness club form might include fields like "Preferred Workout Type", "Membership Level", and "Last Visit Date." These inputs immediately enrich contact profiles, setting the stage for personalized follow-ups.
"Custom Fields allow you to add specific pieces of information related to a contact in the CRM. Once a Custom Field has been added to the system, it will appear in every contact detail page."
One big perk? Real-time updates. As soon as someone fills out a form with custom fields, their contact record is updated automatically. This means workflows tied to those fields can start right away, saving time and keeping everything in sync.
With this enriched data, you’re ready to dive into automation.
Setting Up Automations with Custom Fields
Custom fields shine when used as triggers for automated workflows. They allow you to set up precise conditions - like initiating actions when a field value changes or hits a specific threshold.
Here’s an example: A real estate agency might use the "Home Status" field. When it changes to "Closed", a workflow could automatically update agent records, log the sale in Google Sheets, and clear temporary fields like Notes and Internal Comments.
This feature isn’t limited to contact updates. You can create workflows tied to custom fields across opportunities, deals, and more. For example, a sales team might use an opportunity field like "Probability of Close." If the probability hits 80% or higher, a workflow could notify the sales manager, schedule a follow-up task, and send a proposal template to the prospect. You can even integrate conditional logic, enabling workflows to branch into different paths based on criteria like industry, budget, or service preferences.
Syncing Custom Fields Across Records
Custom fields can be mapped across contacts, opportunities, and related records to create a unified view of your client relationships. When a custom field is updated in one place, related records are updated automatically, eliminating data silos and keeping everything consistent. For example, if you update a contact’s "Budget Range", any associated opportunities will reflect that change.
This syncing capability is especially useful for maintaining consistency across campaigns. In digital marketing, for instance, you can store details like member names, workout preferences, or membership levels as custom values. These values can then be referenced in emails, text messages, or even personalized website content.
When custom fields sync correctly, dynamic content creation becomes a breeze. You can craft email templates that auto-fill with client-specific details, design personalized landing pages, or send targeted social media messages based on stored preferences. The system also tracks all activities related to custom fields - whether they’re created, updated, or deleted - ensuring accountability and providing an audit trail for client data changes.
To ensure syncing works smoothly, focus on keeping your data accurate and up-to-date. Outdated information can disrupt workflows and lead to errors in personalization. Start small by testing syncing setups with limited campaigns, ensuring custom fields populate correctly before scaling up to larger audiences.
sbb-itb-f031672
Best Practices for Managing Custom Fields
Managing custom fields effectively is crucial for keeping your system organized and running smoothly. Think of custom fields as a resource that requires careful planning and regular maintenance to avoid clutter and ensure optimal performance.
Reviewing and Updating Fields
As your business grows and changes, your custom fields should adapt too. A field that was vital six months ago might no longer be relevant, while new demands may call for additional data collection. Regular audits are key to preventing your HighLevel instance from becoming bogged down with outdated or unnecessary fields.
Schedule quarterly reviews to assess which fields are actively in use. Test any changes in a QA environment before applying them to your live system. This minimizes risks and ensures smooth transitions.
To maintain order, establish clear guidelines for naming conventions, approval processes, and documentation. This helps avoid duplicate fields and keeps your system clean. You might also create a "deprecated fields" section to hide outdated fields without deleting them. This approach preserves historical data while keeping your active interface streamlined.
Once your fields are organized, focus on maintaining consistent data capture. This will support automation and improve overall efficiency.
Maintaining Data Quality
After auditing your custom fields, it’s essential to ensure the data within them is accurate and consistent. Poor data management - such as inconsistent formatting, missing validation rules, or unchecked free-text entries - can lead to problems with automation and unreliable reporting.
Choose the right field types from the outset. For example, dropdown menus or checkboxes can enforce uniformity better than free-text fields. Implement validation rules to ensure data like phone numbers, email addresses, and dates follow the correct format. You can also set up dependencies, making certain fields mandatory based on specific selections.
To further reduce input errors, prioritize user-friendly design. Use clear field labels, helpful placeholder text, and logical field arrangements. This makes data entry intuitive and minimizes mistakes.
Regularly review your data to catch issues like duplicates, missing details, or inconsistent formatting. Automated alerts can be a helpful tool for flagging data that doesn’t meet your standards, allowing you to address problems quickly.
Improving Custom Field Performance
After reviewing and cleaning up your fields, the next step is optimizing their performance. Keep in mind that every custom field added to your HighLevel instance can impact system speed and data management complexity. Striking a balance between gathering essential information and maintaining system efficiency is crucial.
Limit custom field creation to administrators to maintain control. Use an external spreadsheet to document each field’s purpose, creation date, and usage frequency. This makes audits easier and helps avoid creating duplicate fields. Before adding a new field, check if an existing one can be slightly adjusted to meet your needs.
Organize related fields into groups and position the most important ones prominently. Less frequently used fields can be moved to secondary sections. Always consider the long-term impact of your field structure and monitor system performance after making changes.
"For optimal use of Custom Fields, follow these guidelines: Avoid unneeded clutter: Only gather necessary and useful information. Avoid confusion: Name fields using your office's standard terminology. Do not re-cycle fields: If you need another field, create a fresh new one. Plan carefully: Once data is gathered for a field, deleting it will delete all its data."
Conclusion
Custom fields open up new possibilities for managing data and connecting with clients by allowing you to capture details that are specific to your business needs. Whether you’re managing property listings or keeping track of campaign budgets, this feature goes well beyond basic contact information, enabling the kind of automation and personalization we explored earlier.
Benefits of Custom Fields
Custom fields aren't just about storing extra information - they transform how you work. By integrating these fields into your workflows, you can automate tasks and create highly targeted campaigns. For example, data entered into a custom field can trigger specific workflows, turning static records into actionable processes. This approach not only streamlines your operations but also helps build stronger client relationships by enabling personalized communication tailored to their needs.
Advance Your Custom Fields Mastery with HL Max
Ready to take your skills to the next level? HL Max offers hands-on tutorials and practical strategies to help you refine your HighLevel expertise. Our content is designed with actionable steps and real-world insights, perfect for digital marketing agencies and growth-focused professionals looking to achieve measurable results.
The time you invest in mastering tools like custom fields can significantly boost your efficiency, enhance client satisfaction, and drive business growth. When used effectively, custom fields become more than just a feature - they’re a powerful tool for elevating your marketing strategies.
FAQs
How can I keep my custom field data in HighLevel accurate and consistent over time?
To keep your HighLevel custom fields accurate and consistent, try these tips:
- Set clear guidelines for data entry: Use consistent naming conventions, predefined field types, and validation rules to minimize mistakes. For instance, require mandatory fields or use dropdown menus to standardize input.
- Review your data regularly: Plan routine audits to catch and correct errors, merge duplicate entries, and clear out old records. Designate someone on your team to manage data quality and ensure everything stays current.
Following these practices will help maintain reliable and useful custom field data over time.
What mistakes should I avoid when setting up custom fields in HighLevel?
When setting up custom fields in HighLevel, there are a few common mistakes you’ll want to avoid to keep things running smoothly and ensure efficient data management.
One frequent error is picking the wrong field type. For instance, if you choose a text field when a dropdown or date field would be more appropriate, it can lead to issues with both data entry and reporting. And here’s the kicker: once a field type is set, you can’t change it. If you need to fix it, you’ll have to delete and recreate the field, which can disrupt your workflow.
Another misstep is not planning or organizing your fields properly. Without a clear structure, your custom fields can become a jumbled mess, making it difficult to locate and manage important information. Taking the time upfront to categorize and structure your fields logically can save you a lot of headaches later.
By carefully planning your custom fields and selecting the correct field types from the beginning, you can streamline your processes and avoid unnecessary hassles.
How can custom fields improve automation workflows and client communication in HighLevel?
Custom Fields in HighLevel
Custom fields in HighLevel make it easier for businesses to create tailored and efficient automation workflows, ensuring interactions meet each client’s specific needs. These fields let you seamlessly include personalized details in emails, SMS, and other communications, making every message feel timely and relevant.
For instance, custom fields can be used to automate actions like sending follow-up messages, appointment reminders, or targeted promotions based on client-specific data. This kind of personalization not only boosts engagement but also strengthens relationships by catering to individual preferences. On top of that, custom fields simplify complex tasks, cutting down on manual work and reducing the chance of errors. The result? Happier clients and smoother operations.